
We're here to help you prepare for your spa delivery
Everything you need to know once you've bought your spa, where to put it at home & how to prepare for the delivery.
Please use this information as a guideline to prepare for delivery and set up of your spa. We have specifically detailed requirements for site selection, delivery access, ground preparation and electrical requirements. We’ve gathered together some useful information for you & your tradies to get to know your way around your new spa prior to installation.
Pre-delivery guide
Sapphire Spas thanks you for supporting Australian made products and wishes you the best in your spa experience
Here to help
Sapphire Spas reserves the right to change features, specifications and design without notification and without incurring any obligation.
IF YOU ARE UNSURE OF ANY ASPECT OF THE SITE PREPARATION PLEASE CONSULT YOUR SAPPHIRE SPAS RETAILER FOR CLARIFICATION
Please take the time to read these instructions thoroughly as they will provide you with information to ensure the safe and timely delivery and installation of your new spa pool or swim spa.
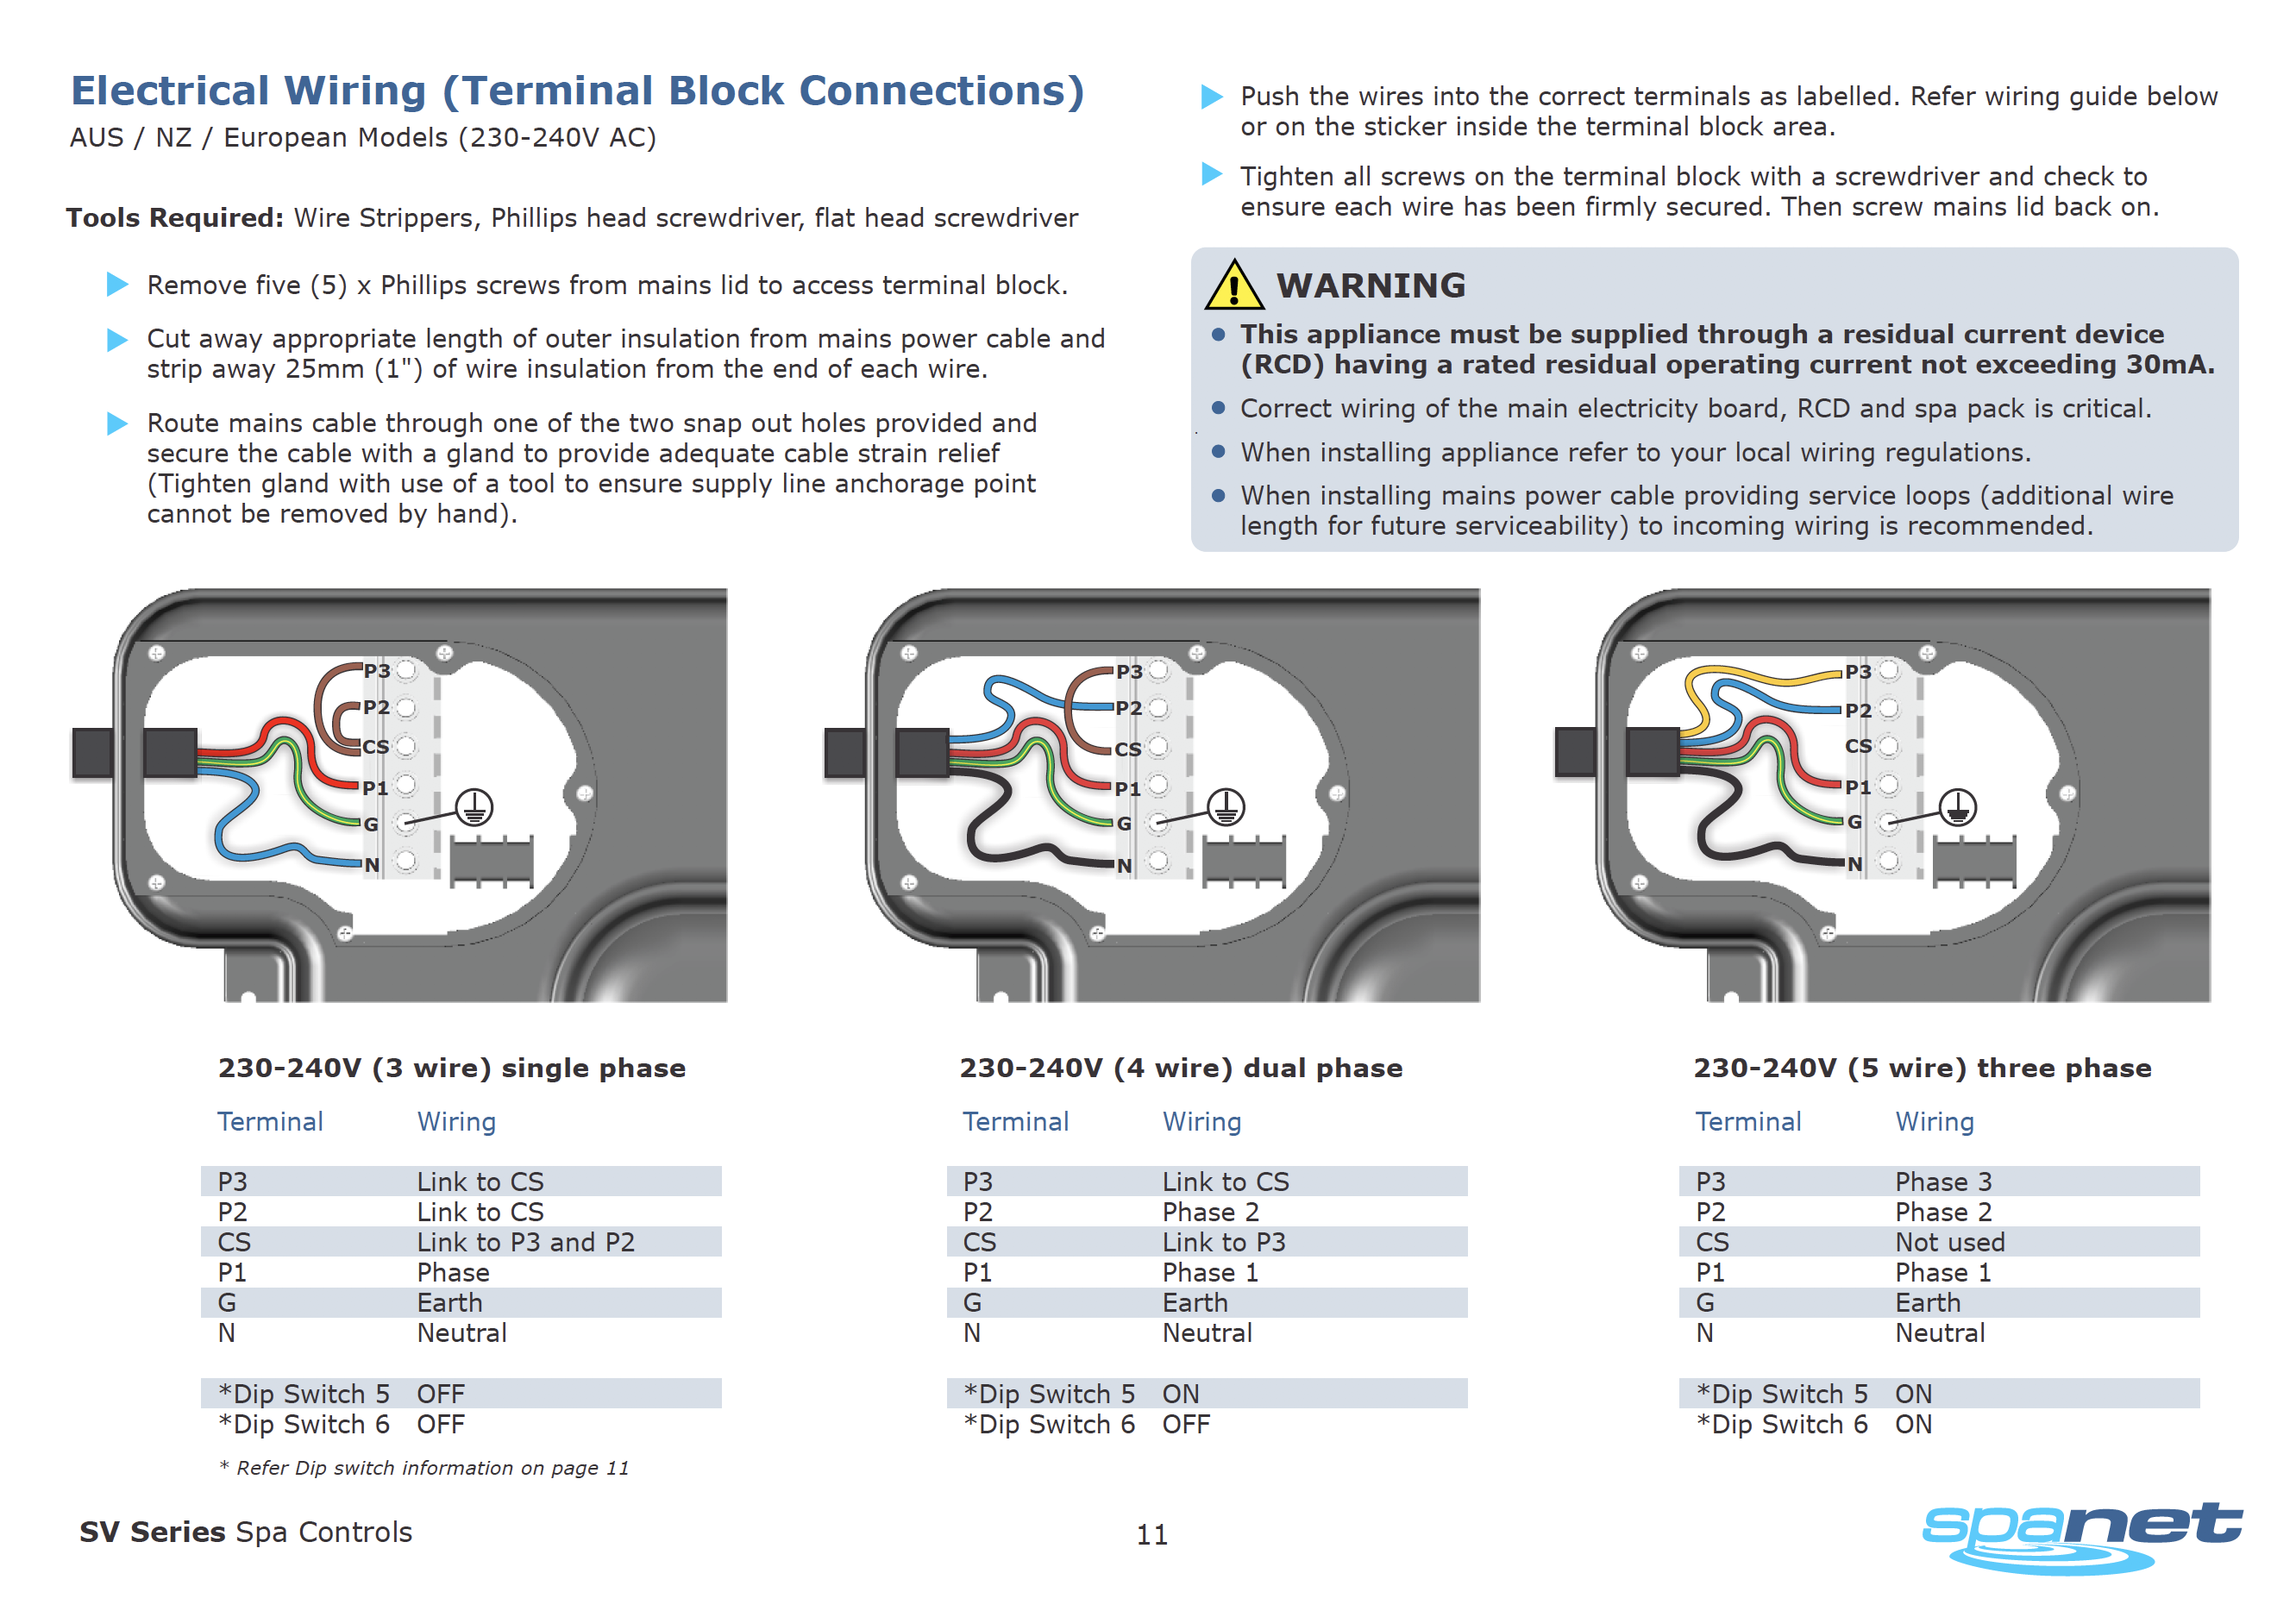
Electrical connection :
You should consult your electrician before spa location / site preparation / concrete slab / decking are decided upon to discuss the best way to supply power to your spa.
Delivery access :
Please ensure clear access is available from the delivery vehicle (crane, truck, ute etc) to the selected location for your spa. You should consider possible restrictions which may apply to your selected delivery route
Supportive base :
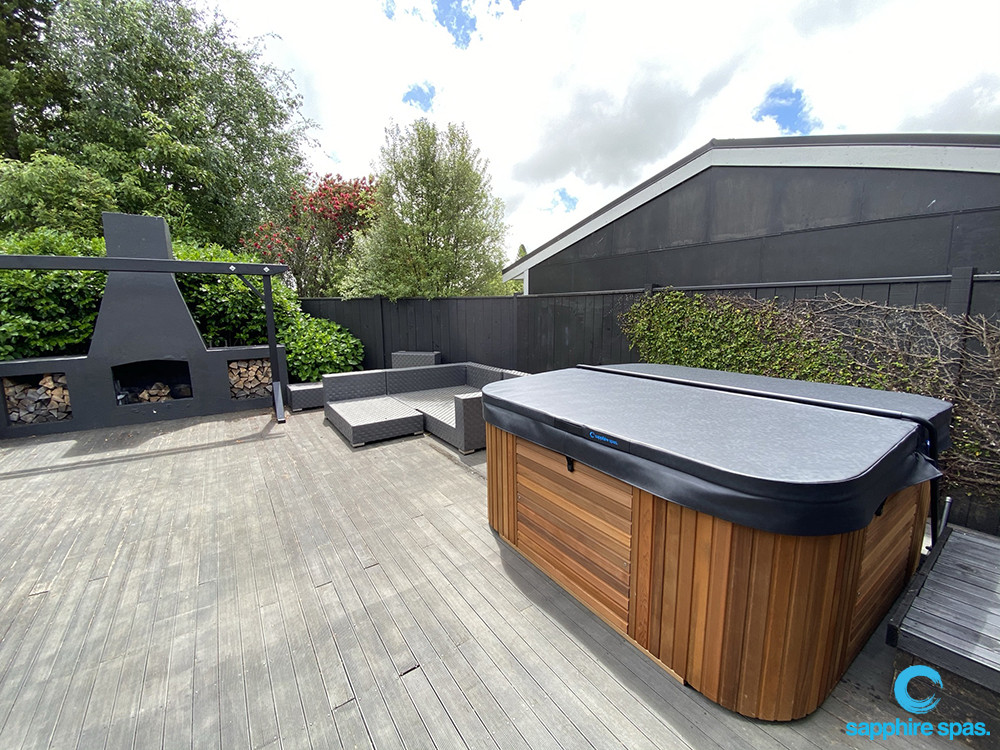
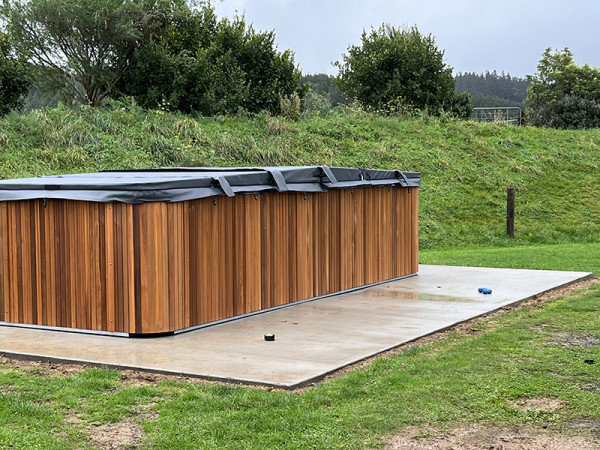
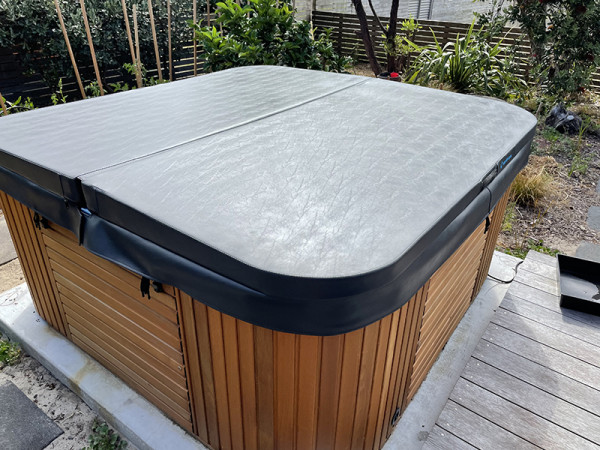
Once you have selected a site for your new spa, ensuring there is 600mm clearance around spa, you’ll need to prepare a solid, level and supportive base which will remain stable for the life of your spa.
Please provide clear access to all side panels and equipment within the cabinet of your spa
Please be mindful of where you position your new spa so you have 600mm clear access to all side panels and equipment within the cabinet. This will be needed for initial installation and also ongoing general maintenance.

How to access your equipment
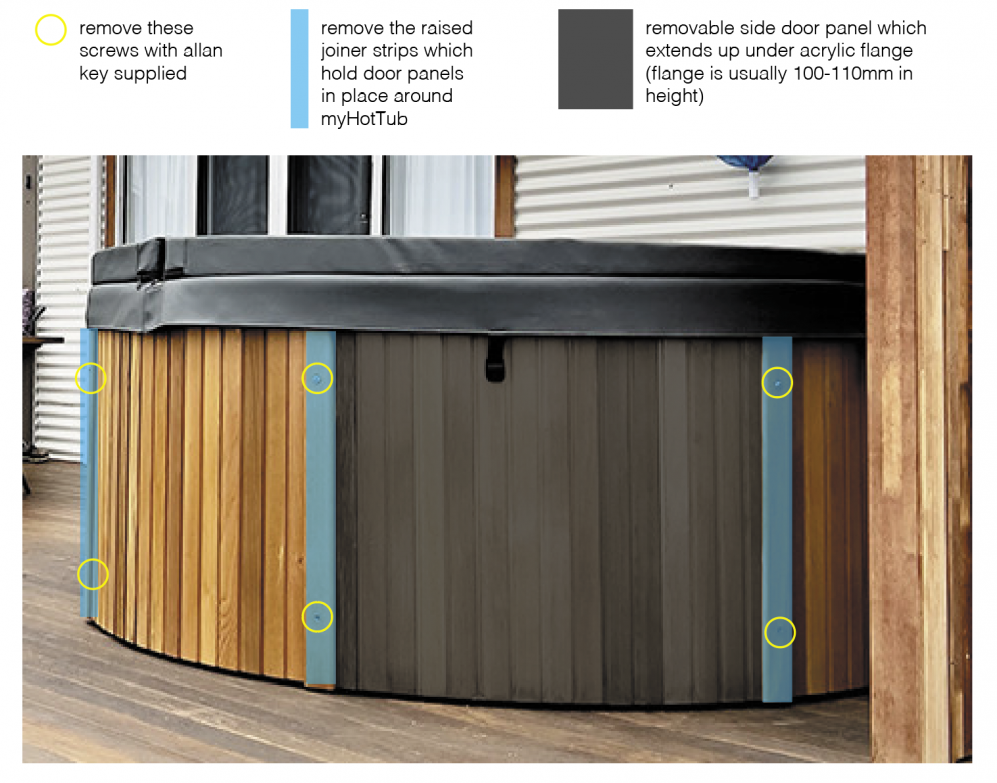
Undo screws with allen key to remove side door panels

Lift bottom of door, slide downwards & remove carefully / Lean vertically in a secure position to avoid damage

Filtration pump (left) hydrojet boost pump (right)

Power supply to control box / Clearzone unit shown in background
![]()
Bleed valve on hydrojet boost pump

Spa blower

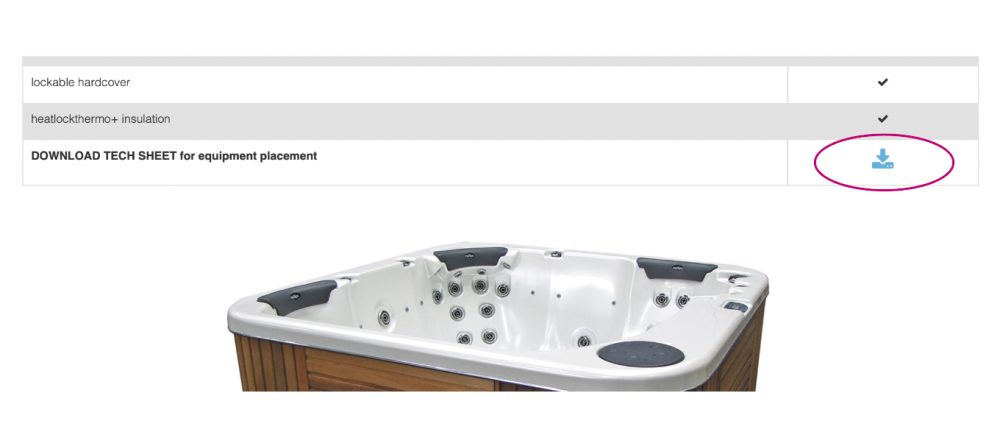
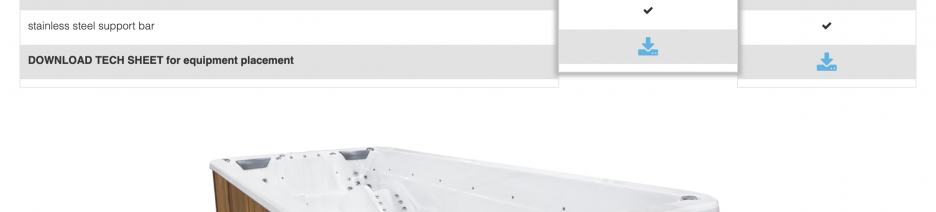
Downloadable tech sheet
Download the 'tech sheet' for your particular spa model for location of equipment within the cabinet (example below of where you'll find download button once you locate your model through 'spa pools' or 'swim spas' top menu option.
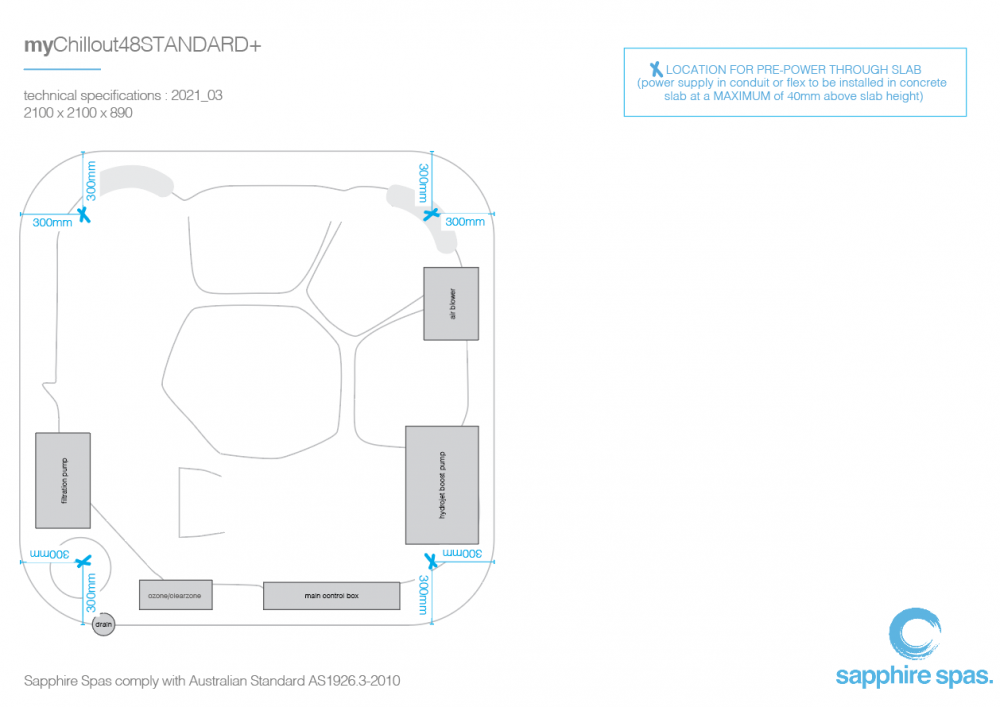
Below is an example of the tech sheet for myChillout spa pool, showing measurements for pre-installing power in conduit/flex through the concrete slab so it enters under the cabinet at one of these locations shown. You must adhere to these directions to avoid interference with equipment already installed within the cabinet which may delay delivery date.
Please provide clear access to all side panels and equipment within the cabinet of your myHotTub
Please be mindful of where you position your new spa so you have 600mm clear access to all side panels and equipment within the cabinet. This will be needed for initial installation and also ongoing general maintenance.
How to remove the cabinet door panels
Plumbing & equipment within the cabinet
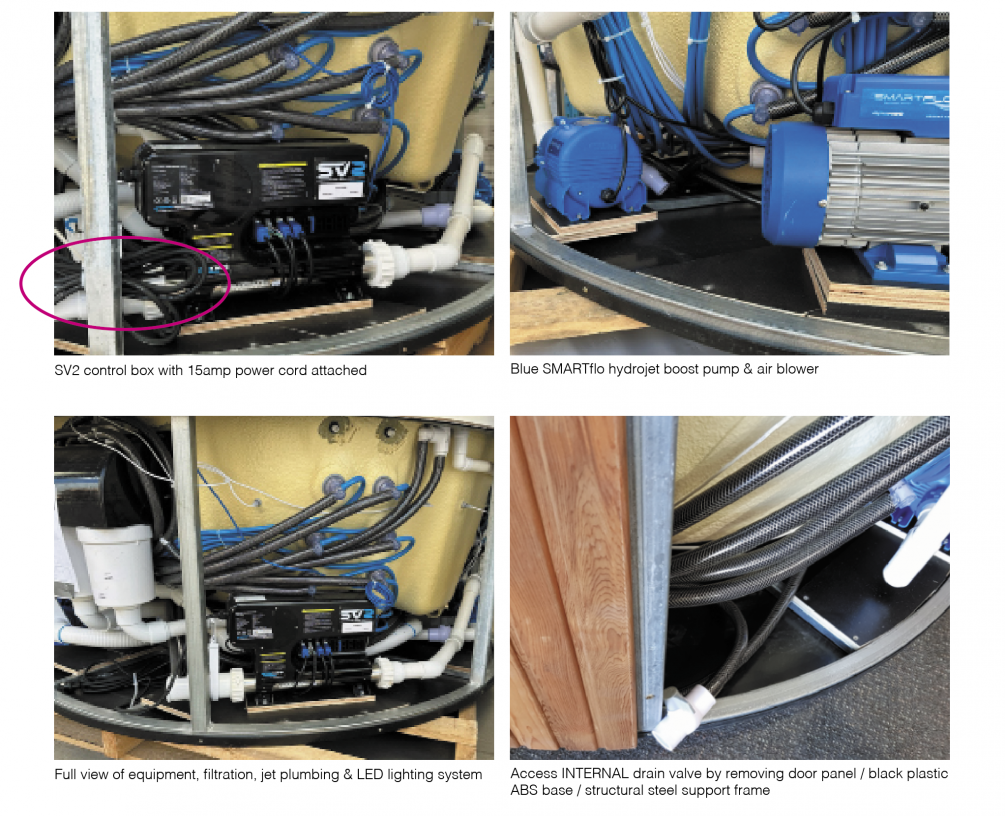
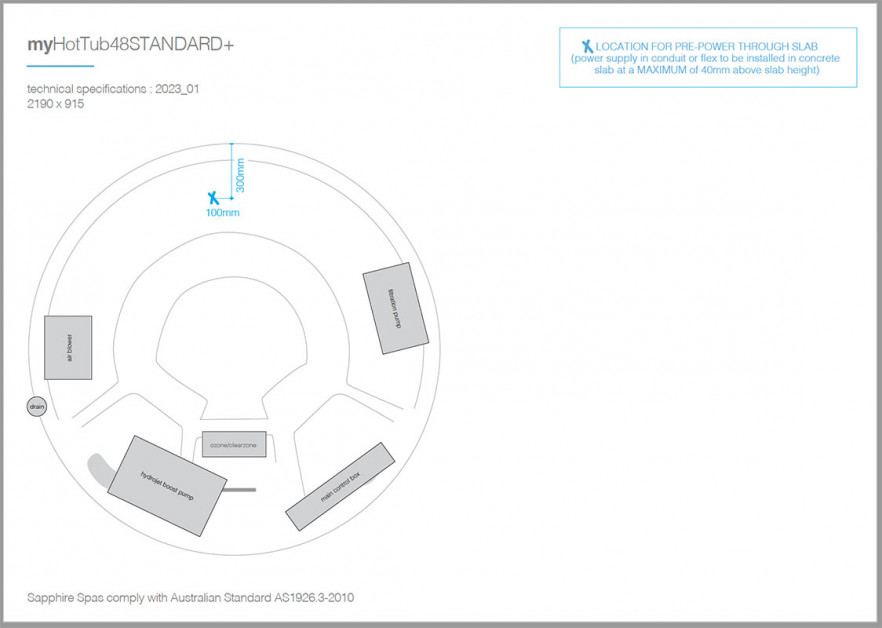
Technical specifications : equipment placement within cabinet
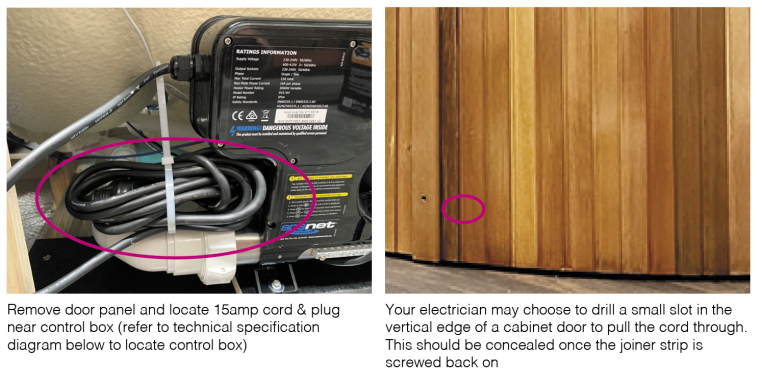
myHotTub electrical cabling access
myHotTub DOES NOT have this corner recess option due to steel frame so please ensure that you've considered power access prior to installing myHotTub. Pre-installing power through your concrete slab is the best option for power supply to myHotTub. The access from rear of spa will then be run through the myHotTub cabinet by your electrician to reach the main controller box.
IMPORTANT : the electrician should install the conduit or flex so that it rises from the concrete slab at a MAXIMUM height of 40mm above the slab surface. If the conduit is higher than 40mm, it may interfere with the equipment within your spa cabinet, which could necessitate further work by your electrician and delay Sapphire delivery date.
Electrical cabling access : THROUGH CABINET
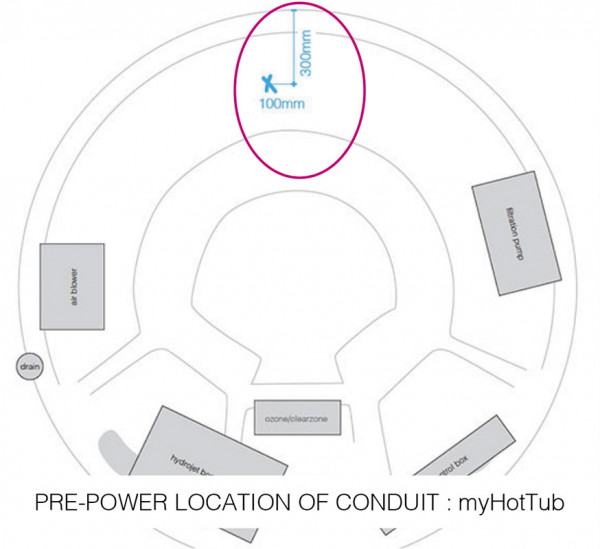
Electrical cabling access : PRE-POWER IN CONCRETE SLAB
Technical specifications showing measurements of where to position conduit to enter spa from base
Please provide clear access to all side panels and equipment within the cabinet of your swim spa
Please be mindful of where you position your new swim spa so you have 600mm clear access to all side panels and equipment within the cabinet. This will be needed for initial installation and also ongoing general maintenance.

SV4 control box, shut off valve, gate valve, blower & pump (post 2019 black pumps) placements : usually positioned under seated areas of spa for more space

SV3 control box, clearzone unit & blue smartflo pumps / HEAT PUMP ready plumbing & gate valves (left under cabinet)

Blue smartflo pumps showing shut off valves

Downloadable tech sheet
Download the 'tech sheet' for your particular swim spa model for location of equipment within the cabinet (example below of where you'll find download button once you locate your model through 'spa pools' or 'swim spas' top menu option.
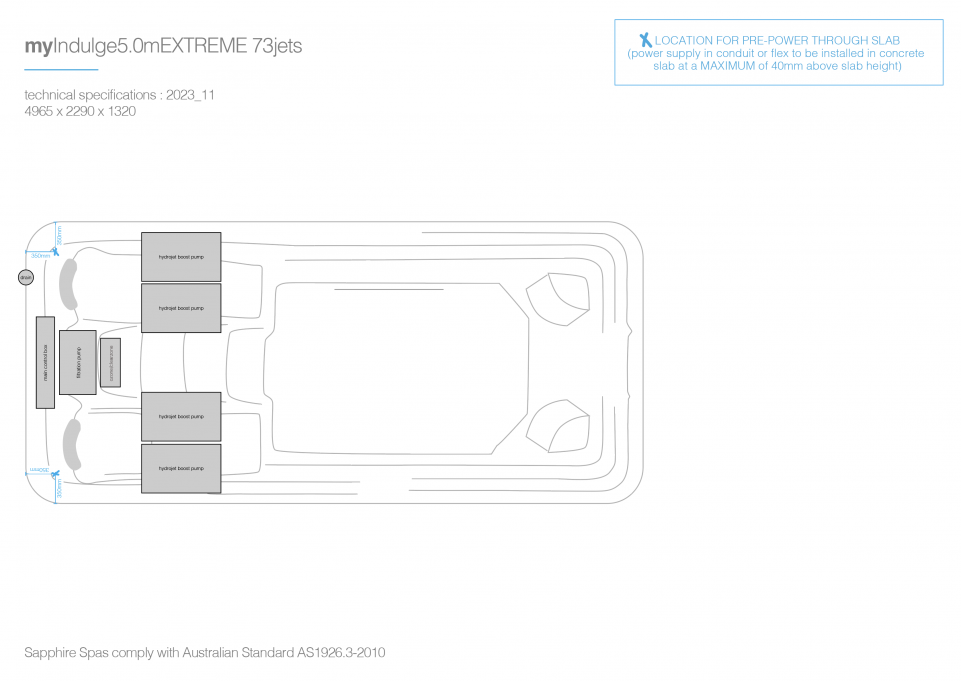
Below is an example of the tech sheet for myIndulge swim spa, showing measurements for pre-installing power in conduit/flex through the concrete slab so it enters under the cabinet at one of these locations shown. You must adhere to these directions to avoid interference with equipment already installed within the cabinet which may delay delivery date.
NOTE : please DOWNLOAD TECH SHEET on your particular swim spa model to ensure these measurements are accurate.
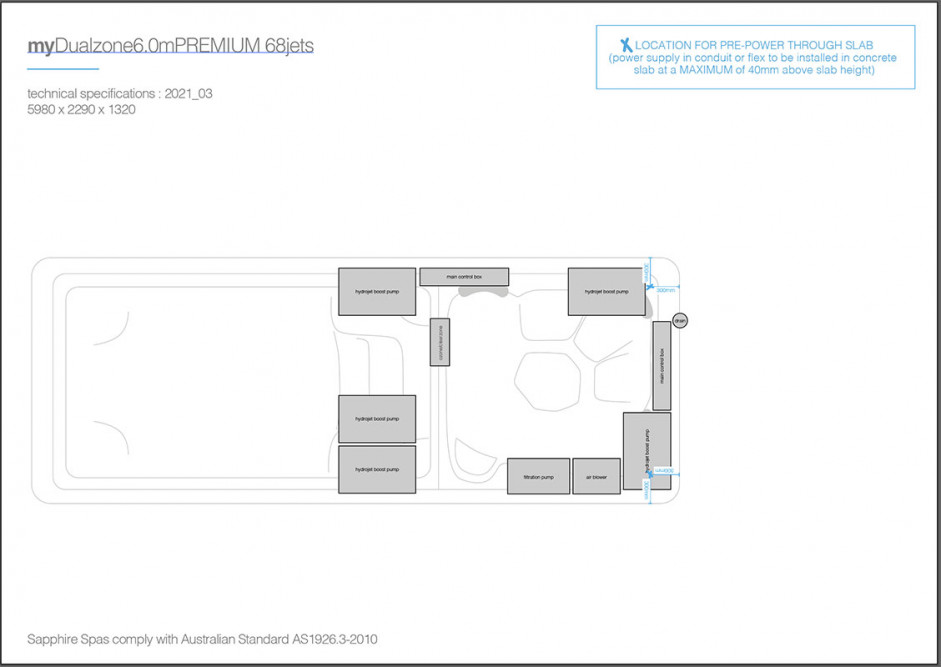
Please provide clear access to all side panels and equipment within the cabinet of myDualzone
Please be mindful of where you position myDualzone so you have 600mm clear access to all side panels and equipment within the cabinet. This will be needed for initial installation and also ongoing general maintenance.

Spanet control box, shut off valves, gate valves, blower & pump (post 2019 black pumps) placements : usually positioned under seated areas of spa for more space. Pink highlighted areas show electrical access points.

SV3 control box, clearzone unit & blue smartflo pumps / HEAT PUMP ready plumbing & gate valves (left under cabinet)
Blue smartflo pumps showing shut off valves
Ask your local retailer for a technical line drawing of your chosen spa for product & componentry placement

Downloadable tech sheet
Download the 'tech sheet' for your particular swim spa model for location of equipment within the cabinet (example below of where you'll find download button once you locate your model through 'spa pools' or 'swim spas' top menu option.
Below is an example of the tech sheet for myDualzone swim spa, showing measurements for pre-installing power in conduit/flex through the concrete slab so it enters under the cabinet at one of these locations shown. You must adhere to these directions to avoid interference with equipment already installed within the cabinet which may delay delivery date.
How much power does my spa need?
Prior to installation of your spa, your electrician will need to arrange adequate power supply for your spa. You can find details of the power requirements in the 'product specifications' table on the website page for your chosen spa model (search for your spa model using the 'spa pools' or 'swim spas' tab in the top menu bar, then scroll down the page to the table which looks like this below (example: 32amp power is required for the classic model below)
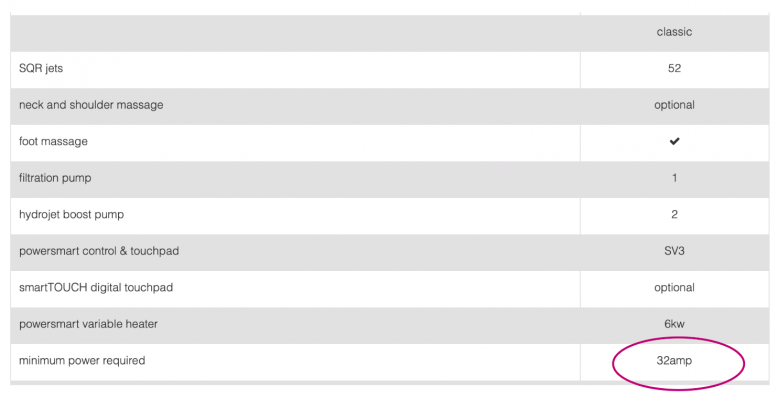
Minimum power requirement is stated
Please note, we will always quote the minimum power requirement. For example, our spas which state 15amp minimum power requirement, can run on the 15amp cord and plug which they're supplied with. You also have the option to hardwire to provide more amperage, ie. 25amp, to optimise heating whilst you're in your spa and using the jets and heating simultaneously. 25amp, 32amp and 45amp power supply will always require a qualified electrician to install.
All Sapphire STANDARD / STANDARD+ / CLASSIC models come with a 4.5m power cord & 15amp plug (manufacturer’s warranty will be void if extension cords are used).
We recommend you discuss your available power with your electrician as they will be able to work out the ideal set up for your home and the spa or swim spa you've purchased.
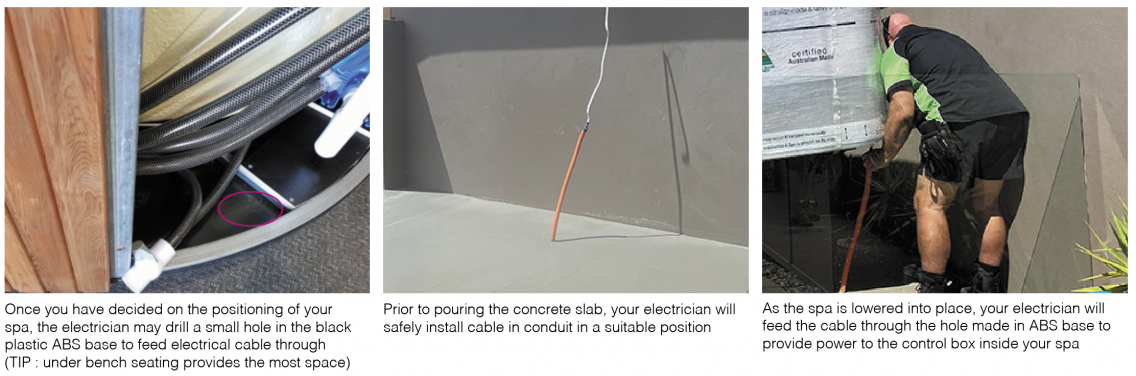
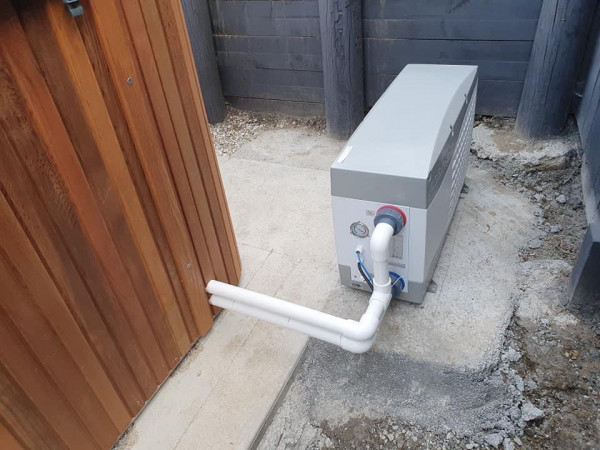
How to get the power supply into the cabinet
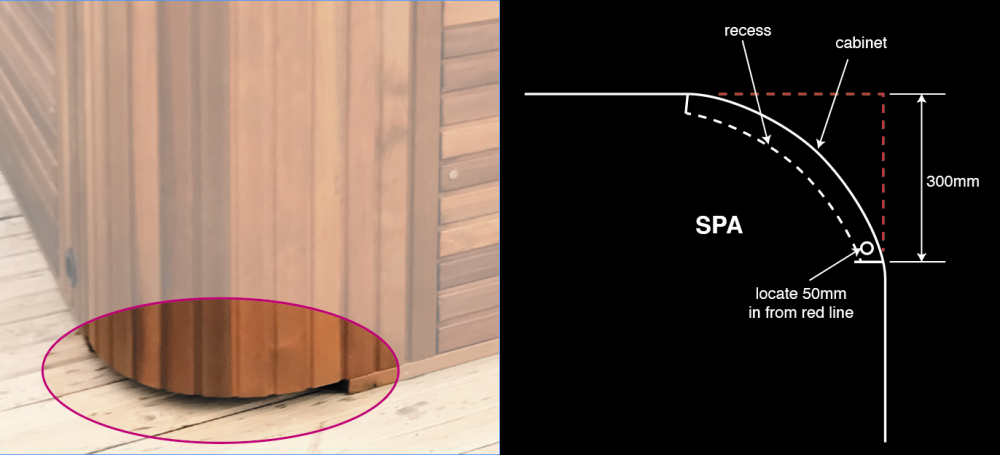
CORNER RECESS : spas or swim spas
Sapphire spas and swim spas are manufactured to provide power supply access through the recess at the base of the rounded cabinet corners (see image and diagram below). There should be enough room to push the 15amp power cord through or for your electrician to use as an entry point for the conduit to supply power to your spa or swim spa.) The location 50mm in from red line, suggested below, is ideal for this method of supplying power to your new spa or swim spa.
mySpace & myGetaway exclusion
Please confirm the best way to provide electrical access for mySpace & myGetaway with your local spa pool supplier or Sapphire Spas Head Office.
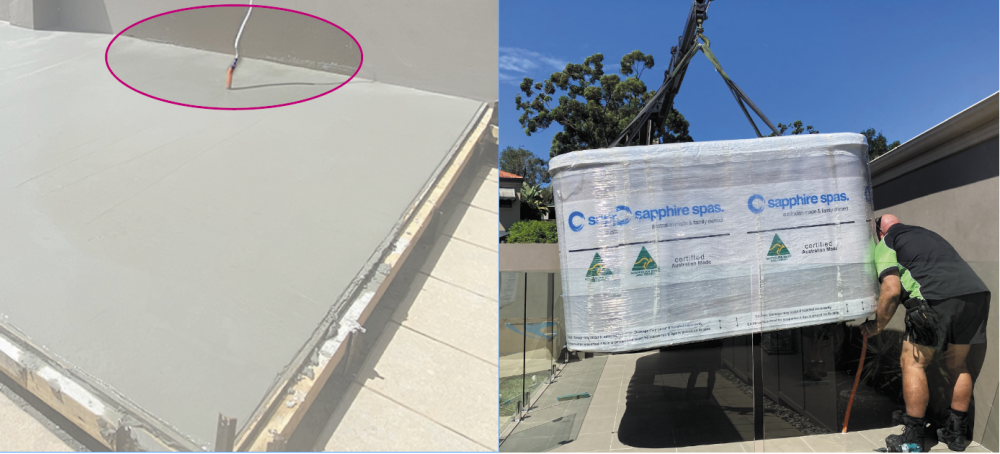
PRE-POWER THROUGH CONCRETE SLAB : spas or swim spas
Our spa pool and swim spa models also allow for the option to install electrical conduit/flex into the concrete slab so it's concealed within the cabinet. Please use the information provided to guide your electrician on where to connect power in this way as delivery may be delayed if the power has not been positioned correctly.
IMPORTANT : the electrician should install the conduit or flex so that it rises from the concrete slab at a MAXIMUM height of 40mm above the slab surface. If the conduit is higher than 40mm, it may interfere with the equipment within your spa cabinet, which could necessitate further work by your electrician and delay Sapphire delivery date.
Download the 'tech sheet' for your particular spa or swim spa model for location of pre-power options available to you (example below of where you'll find download button once you locate your model through 'spa pools' or 'swim spas' top menu option.
Below is an example of the tech sheet for myChillout spa pool, showing measurements for pre-installing power in conduit/flex through the concrete slab so it enters under the cabinet at one of these locations shown. You must adhere to these directions to avoid interference with equipment already installed within the cabinet which may delay delivery date.
myHotTub exclusion
myHotTub DOES NOT have this corner recess option due to steel frame so please ensure that you've considered power access prior to installing myHotTub. Pre-installing power through your concrete slab is the best option for power supply to myHotTub. The access from rear of spa will then be run through the myHotTub cabinet by your electrician to reach the main controller box.
IMPORTANT : the electrician should install the conduit or flex so that it rises from the concrete slab at a MAXIMUM height of 40mm above the slab surface. If the conduit is higher than 40mm, it may interfere with the equipment within your spa cabinet, which could necessitate further work by your electrician and delay Sapphire delivery date.
Electrical cabling access : THROUGH CABINET
Electrical cabling access : PRE-POWER IN CONCRETE SLAB
Technical specifications showing measurements of where to position conduit to enter spa from base
Provide this document to your electrician when they're connecting your spa to the power supply.
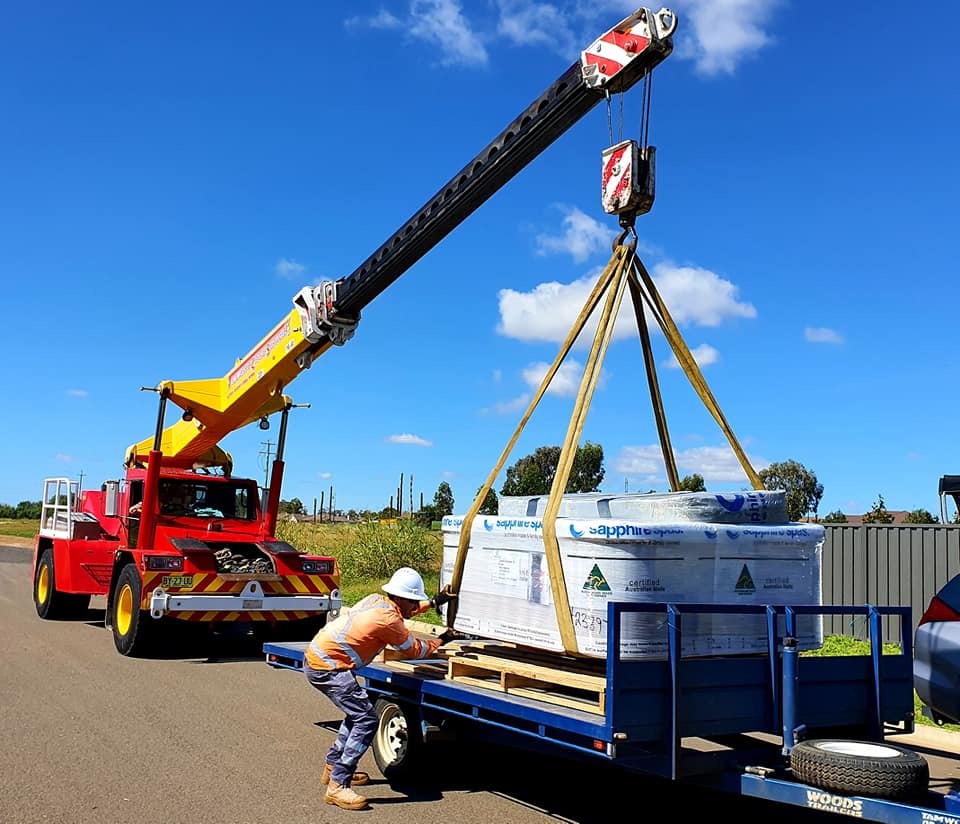
Delivery access
Prior to the arrival of your new SpaPool or SwimSpa, please ensure clear access is available from the delivery vehicle (crane, truck, ute etc) to the selected location for your spa.
Consult your dealer for details of space required to manoeuvre and park. The driver will make every effort to get as close to the site as possible to unload your spa. You will need to be on hand for the delivery and ensure you provide enough manpower to manoeuvre the spa onto site. Consult your dealer in relation to assistance such as trolleys.
Check the dimensions of your spa as per your brochure. Your spa may be tilted onto its side to fit through a smaller pathway, but you need to then allow for the increased height of the spa and any trolley being used.
Always use a reputable crane or delivery company who can provide proof of insurance on request.

more difficult sites
Please consult your Sapphire Spas dealer to discuss further measures should you not meet the recommended requirements. A crane is sometimes necessary but is not included in a standard delivery price.
Delivery route restrictions
Please consider these possible restrictions which may apply to your selected delivery route:
- the width of all doorways, gates and pathways
- the height of low trees, roof eaves, guttering or elephone lines
- tight bends to be negotiated, ex. 90 degree turn (take measurements)
- obstruction from protruding fixed objects, ex. meter boxes, a/c units, hot water services etc
- you may have to cut or tie back shrubs or trees, move dog kennels, bbq’s, planter boxes or wood piles
- severe slopes along the route which may cause trouble
A. check height of low trees, roof eaves, guttering, phone lines
B. move dog kennels, bbq's, planter boxes, kids play equipment
C. check corner clearances
D. check width of doorways, gates & pathways
E. advise of steep slopes & number of steps
F. check meter boxes, a/c units, hot water services, water/ gas meters

A solid foundation
Once you have selected a site for your new spa, ensuring there is the suggested 600mm clearance all around, you’ll need to prepare a solid, level foundation which will remain stable for the life of your spa.
No fall / gradient is to be present within spa footprint; the concrete surface should be finished with a perfectly flat screed.
A typical spa in use poses a considerable weight for any foundation to support. Even our smaller spas can weigh up to 2000kg when filled with water and occupants, some of our larger models can reach 3000kg and our swim spa up to 7000kg.
Refer to your brochure or our website for dimensions and approximate filled weights of Sapphire Spas models. For example, the specifications on myChillout spa page (https://www.sapphirespas.com.au/spa-pools/mychillout) show that it weighs 1535kg when full of water plus the weight of the people in the spa. Remember, weight of occupants must also be considered in addition to these figures.
Do not put your spa on any soft surface such as grass, sand, pebble or dirt as this may place undue stress on your spa, causing it to distort and/or crack.
Damage caused by an inadequate foundation will void the warranty on your spa. It is the owner’s responsibility to ensure correct installation of the spa.
Whether choosing a concrete slab or timber decking to support your spa pool, Sapphire Spas strongly recommend the use of a licensed contractor.
Sapphire Spas recommend the best way to provide a solid foundation which has an even, level surface, free from cracks or hollows, is with a concrete slab.
CONCRETE SLAB - tips on building a solid foundation for your spa, swim spa or plunge pool
A reinforced concrete slab of at least 100mm thick is a suitable foundation for your spa; this must be increased to a minimum of 150mm thick when installing swim spas. You must ensure this base is an even, level surface free from cracks, doming or hollows.
No fall / gradient is to be present within spa footprint; the concrete surface should be finished with a perfectly flat screed.
SPA POOLS (up to 3500mm in length) - minimum 100mm thick concrete slab / 1 layer of steel reinforcing mesh
SWIM SPAS (4000mm+ in length) - minimum 150mm thick concrete slab / 2 layers of steel reinforcing mesh
SIZE OF SLAB
It’s preferable for the slab to extend at least 200mm outside the spa dimensions for stability.
You may also like to extend the concrete slab to allow for fixing your safety barrier fencing and also to provide a stable base for an external heat & cool pump, if fitted.
EXTEND CONCRETE TO ALLOW FOR FENCING & HEAT&COOL PUMP EQUIPMENT
You may also like to extend the concrete slab to allow for fixing your safety barrier fencing and also to provide a stable base for an external heat & cool pump, if fitted.
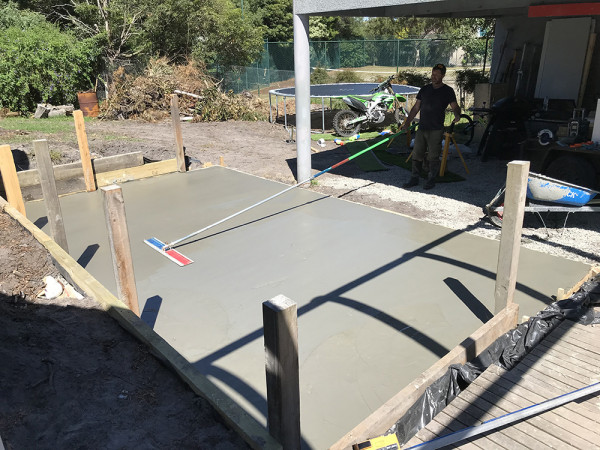
PREPARATION
Your tradesman will prepare a level surface, large enough to extend approximately 200mm on all sides of your spa cabinet dimensions. This will help to provide stability and prevent cracking of the concrete. The space which will be required for the footprint of your new spa will need to be scraped to level out by removing any uneven grass, debris and clumps of dirt.
After the initial ground preparation, rock is usually added to the prepared dirt area, to provide stability, prior to the concrete being poured.
LEVEL SPA FOOTPRINT
No fall / gradient is to be present within spa footprint; the concrete surface should be finished with a perfectly flat screed.
If you pre-power through concrete to conceal the electrical connection, the concrete surrounding the conduit needs to perfectly cleaned so no raised areas are possibly going to interfere with the spa base as it’s positioned over the electrical conduit
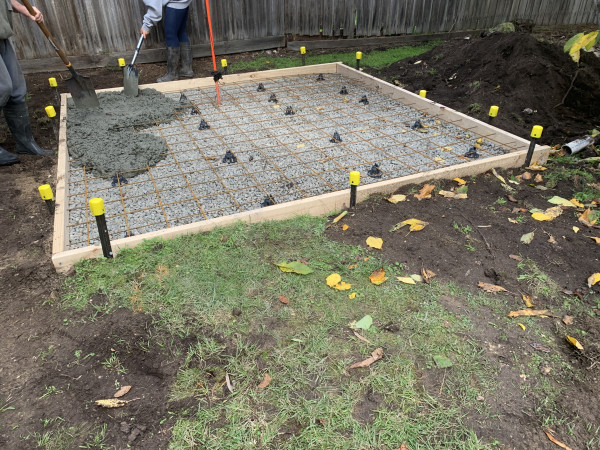
REINFORCEMENT
Always check with local conditions but these are minimum suggested specifications for concrete spa and swim spa slabs
SPAS
- minimum 100mm thick
- 1 layer of SL72 steel reinforcement mesh
- no fall / gradient is to be present within spa footprint; the concrete surface should be finished with a perfectly flat screed
- suggested 25mpa concrete mix
SWIM SPAS
- minimum 150mm thick
- 2 layers of SL82 steel reinforcement mesh
- no fall / gradient is to be present within spa footprint; the concrete surface should be finished with a perfectly flat screed
- suggested 25mpa concrete mix
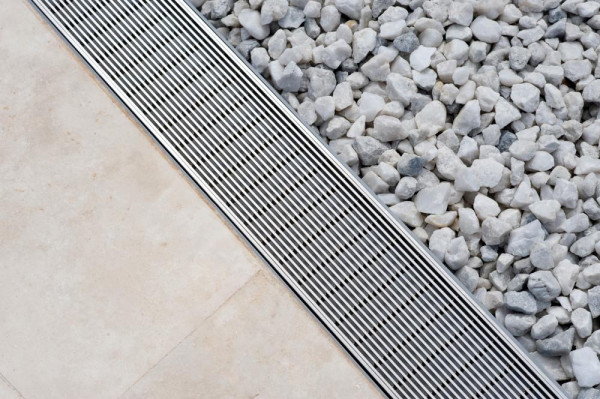
DRAINAGE
If you want to create any fall/gradient across the slab, it needs to be outside the spa footprint. There entire area on which the spa cabinet rests, needs to be flat and level; no slope or gradient is acceptable as this may cause the spa frame to warp and twist thus voiding warranty
Any drainage channels need to be installed outside of the spa footprint (see diagram)
WE'RE HERE TO HELP
We hope this information has now prepared you to liaise with your concrete tradie to construct a level, even slab to adequately support the weight of your new spa. Any movement due to inadequate foundations may place unnecessary stress on the acrylic shell or cabinet, possibly causing damage which can not be covered by warranty.
All work is to be conducted within the constraints and recommendations of your local building authority.
If you have any questions, please just ask your local spa retailer or call the Sapphire team on 1300 069 772 for advice on a stable foundation for your new spa purchase which will provide trouble free enjoyment for many years to come.
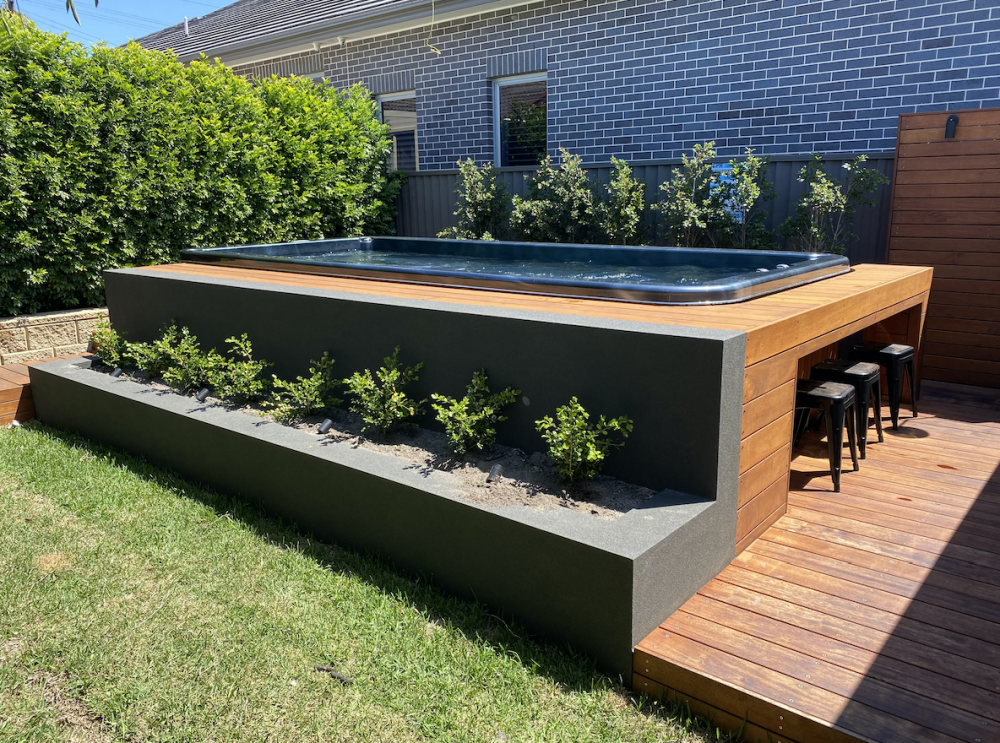
Timber decking
Sapphire Spas recommend that you consult a structural engineer to ensure that your decking is capable of safely and adequately supporting the full weight of your spa when in use. Should you wish to surround your spa with decking, we suggest that you install it on a concrete slab (as above) then build the deck to surround your spa.
SAPPHIRE SPAS WILL TAKE NO RESPONSIBILITY FOR THE INSTALLATION OF YOUR SPA
Regulations which you should consider
It is important that home owners comply with state and council regulations which are in place to improve safety outcomes. Additional information can be obtained from your local council or visiting spasa.com.au.
safety considerations
- your spa cannot be positioned within three (3) metres of overhead power lines or existing power outlets.
- a qualified electrician must be consulted to complete all electrical requirements necessary for your new spa pool.
- temporary and permanent fencing may be required to comply with council regulations.
- Sapphire Spas will not be held responsible for any issues arising from these safety or compliance requirements.
electrical requirements
- the electrical connection to your Sapphire portable spa pool is your responsibility.
- you must ensure that all regulations and codes are adhered to. The connection must be completed by a qualified electrician who must supply an Electrical Safety Certificate.
- a copy of the Electrical Safety Certificate may be requested by your dealer or the manufacturer if requesting a warranty claim.
- it is recommended that a separate circuit be dedicated to your spa pool with sizing and amperage dependant on the type of spa pool and the equipment used.
- all other regulations must be adhered to and Sapphire Spas will not be held responsible for any actions taken by yourself or any technicians that may void warranties or violate local authorities’ regulations and laws.
Equipotential Bonding (Grounding)
Metal Objects such as steps and gazebos that are within arms reach of a vessel of water such as spas and swim spas may require Equipotential Bonding (Grounding) as per AS/NZS 3000:2018.
It is the property owners responsibility to consult a Licensed Electrician to ascertain if Equipotential Bonding is required.
DAMAGE TO YOUR SPA DUE TO INCORRECT ELECTRICAL REQUIREMENTS WILL NOT BE COVERED BY YOUR SAPPHIRE SPAS WARRANTY
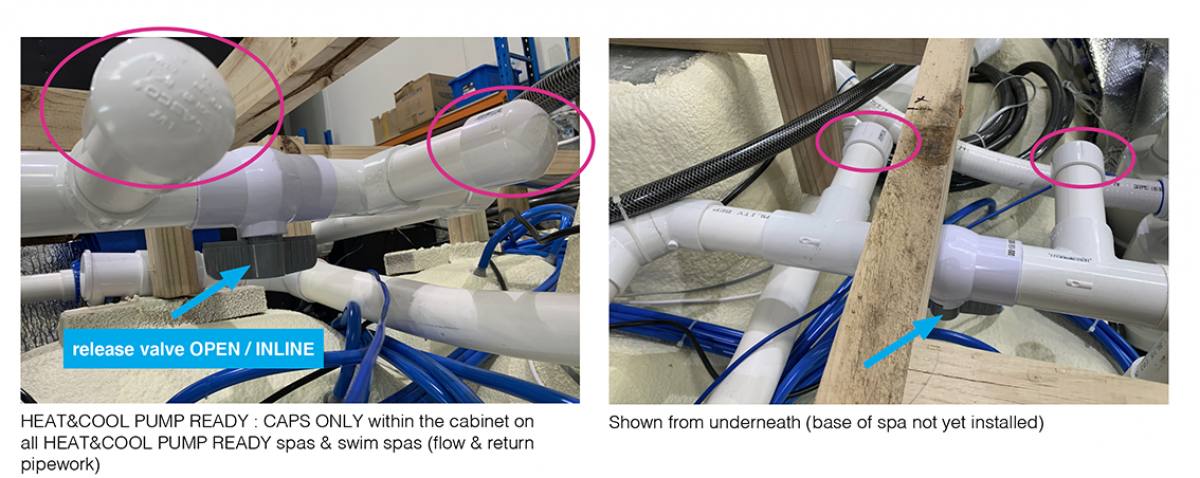
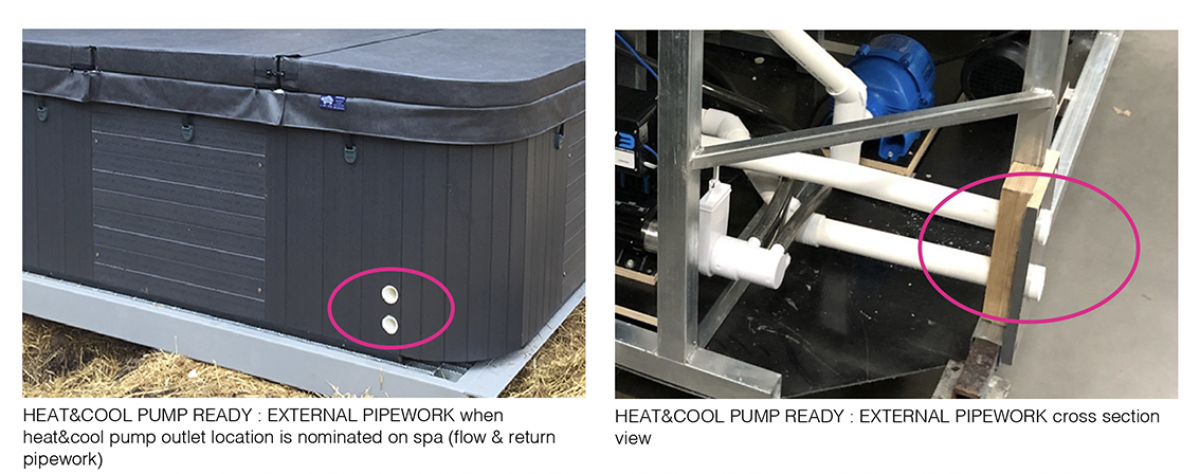
Heat & cool pump pipe location
When ordering your spa with a heat&cool pump, you will need to select the best position for the pipework to exit the spa cabinet. We recommend choosing either position A / B / C / D (refer diagram) for the heat&cool pump pipework to exit your spa to keep the heat&cool pump as close as possible to the main control box for best efficiency.
Keep the heat&cool pump as close as possible to the spa, but further than minimum 300mm.
NOTE: Your Spanet heat&cool pump will come with a 5m data cable. If DISTANCE FROM MAIN CONTROL BOX to heat pump is > 5.0 metres, a 10m data cable will need to be purchased and installed.


Heat & cool pump location considerations
The SV series of heat&cool pumps must be located outside in a clear area where noise and air flow will not be disruptive. The heat&cool pump must be located externally to the spa pool cabinet to allow sufficient air flow for optimum efficiency.
The heat&cool pump MUST be installed according to the air space requirements shown below and the instruction manual supplied with your spa (refer inset image).
FAILURE TO FOLLOW THESE INSTRUCTIONS WILL IMMEDIATELY VOID ANY WARRANTY


Select a suitable location in accordance with below notes and consult the local swimming pool safety regulations to check the requirements for proximity to other equipment.
1. the heat&cool pump must be situated away from vegetation and obstacles as per diagram.
2. the heat&cool pump must be installed outside, external to the spa cabinet.
3. the heat&cool pump should be mounted on anti vibration mounts on a dead flat / level base. The base should be a large concrete slab. The base must have sufficient height to prevent entry of water into the bottom of the heat pump. The base must be large and heavy enough to properly secure the heat pump.
4. height must be adjusted to fit the condensation drain pipe work under the heat&cool pump.
5. do not install the heat&cool pump in a confined space to prevent recycling of air.
6. the fan should not blow towards windows, walls or spaces likely to be inhabited by people or animals.
7. do not install where it is likely to be subjected to polluted air, dust or debris etc.
8. the heat&cool pump must operate with a clean air supply.
9. avoid direct fan output against the dominant wind directions.
10. protect the heat&cool pump from possible snow fall.
11. locate heat&cool pump in a place inaccessible by children.
Heat & cool pump installation instructions
The heat&cool pump will be supplied with a data and power cable already fitted.
They simply need to be connected to the Spanet SV spa control by referring to the SV Series Heat Pump Manual supplied with your spa.
![]() Spanet SV Series HEAT PUMP Manual (1.2 MB)
Spanet SV Series HEAT PUMP Manual (1.2 MB)
Once connected, the SV controller will automatically detect the heat pump and enable its operation. Operation and use of the heat&cool pump is covered in a dedicated section of the Manual provided.
A separate power source for the heat pump is not required.